Posts

Showing posts from September, 2016
Image
ESP8266 AT firmware :  As in previous post we have seen ESP8266 as stand alone but some time in some application we need only WiFi connectivity or simple WiFi module that can be controlled through AT commands. we can program ESP8266 for work on AT command. Required: 1) ESP8266 3) USB to serial convertor Step 1:  Setup ESP8266 as given in this post. Step 2:   Download ESP8266 AT command firmware by AI Thinker. Step 3: press and hold Flash button(GPIO0 = GND) then press Reset button(RESET pin = GND) release RESET button then Flash button now ESP8266 goes into Flash mode. Step 4: Extract downloaded rar file.     Step 5: open "flash.cmd"  file and wait for complete flashing process.   Step 6:  Setup local Server for receive data. I use TCPClientServe software which allow you to create local server and client to send and receive data over TCP Download Here  Enter port 6000 and start listening. Step 7 :  Open Serial terminal at baudr
Image
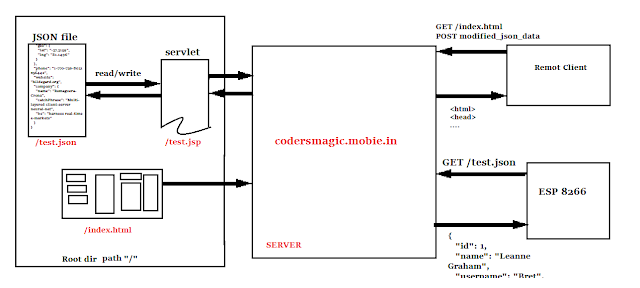
Fetch and parse JSON on ESP8266 wifi module : Use case:  I want monitor particular json stored on server which can be modify by website from remote distance. It can be useful where you can modify control bits from website and change GPIO status at ESP8266 side. 1) Home automation 2) Information parsing 3) Staus monitoring 4) non realtime notification This system work on principle on monitoring files. Feature :   Stand alone operation of ESP8266.   Uses JSON parsing so data extraction is very easy. Required : 1)ESP8266 2)Arduino or any USB to serial converter with 3.3v or 5v power connection pin out. Basic Working:     ESP8266 :  It uses the local router to connect internet and fetch JSON from server using HTTP get request after every second parse it and display JSON variables on serial monitor(you can compare them and change GPIO for device control). Shown in diagram it send GET request at server and server send back HEADER + JSON to ESP8266 HTTP request
Image
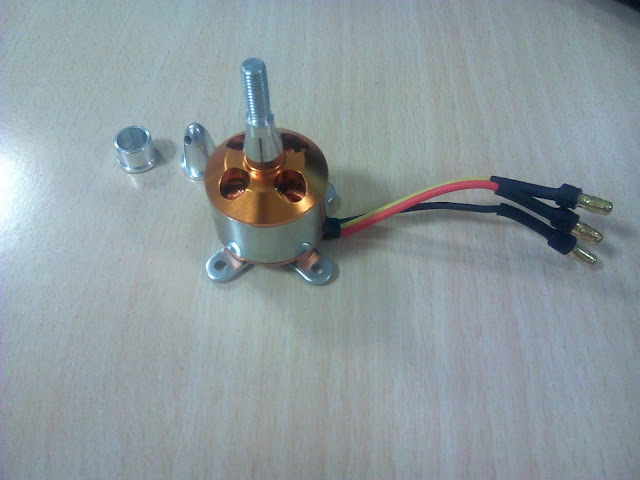
Testing BLD( Brushless DC) motor with arduino: Requered: 1) BLD motor link for buy in India( cost 450rs - 500rs )( Buy from Amezon ) Note: carefully buy BLD motor 1000KVA is ok for beginners. see the bullet connectors are their. 2) ESC( Electronic Speed Controller)(cost 450rs - 500rs)( Buy from Amezon ). 3)Arduino UNO. 4)Power Supply or  11.1v battery (it will be ok if voltage source between 8v - 12v , 2A). 5) Connecting wires. Step 1:  see the part witch i used to test BLD motor  BLD motor ESC Propellar( Be careful before ruining motor with propeller)( you can Buy from Amezon ).     Step 2 : Their is two method to operate BLD motor using arduino   i) By using library and without library  ii) Without library  Step 3 : Make connection between BLD motor and ESC as given in diagram Note  : Do not connect ESC vcc pin to Arduino. May be it will damage ESC Step 4 : load one of the following sketch in arduino.  here pin 10 is signal pin. With Librar
Image
Program ESP8266 WiFi module with Arduino IDE: The Arduino IDE software (short for Integrated Development Environment) is the foundation of what has made the Arduino platform so successful. With it, Makers can program a wide range of compatible microcontroller boards using Arduino’s relatively approachable programming language. Behind the scenes, the IDE software translates your instructions into a more complex code required for your board’s specific chip. Aside from generally cleaning up a number of known bugs, the new update introduces a number of new tools and features. One of the useful feature is board manager which allow use to add customized and diffrent board support in Arduino IDE. In this tutorial we are going to add ESP8266 board in Arduino IDE and program it without and programmer simple using RX, TX pin. Required : 1) ESP8266 2) Arduino UNO 3)connecting wires 4) Local wifi router Step 1 : For buy ESP8266 module here amezon link is given Buy ES
Image
How to install Kali Linux on Raspberry PI : Required : 1) Raspberry Pi 2) minimum 8GB memory card 3) USB cable 4) HDMI cable 5) HDMI Monitor 6) High speed internet Step 1: Download Kali Linux image for ARM from official site or below given link and Extract Kali kali-2.1.2-rpi2.img.xz file. Image Name Size Version SHA1Sum RaspberryPi 2 / 3 1166M 2.1.2 db36fcd53c630fd32f2f8943dddd9f57b3673c5a RaspberryPi 1506M 2.1.2 9db8ade0fbc9265a9b913e5d00ecedacb68ae3a7 RaspberryPi w/TFT 880M 2.1.2 fac66a2a8f4f9738f3f742c2a71870824fb5c105 Step 2: Download Win32 DiskImager software from source forge or given link https://sourceforge.net/projects/win32diskimager/ and install it. Step 3: put your memory card in card reader and connect it to compute here my drive is I: . Open Win32 DiskImager and select kali-2.1.2-rpi2.img file then select proper drive later for memory card if by mistake you choose hard disk partition it will wipe out th