ESP8266 AT firmware :
As in previous post we have seen ESP8266 as stand alone but some time in some application we need only WiFi connectivity or simple WiFi module that can be controlled through AT commands. we can program ESP8266 for work on AT command.
Required:
1) ESP8266
3) USB to serial convertor
Step 1:
Setup ESP8266 as given in this post.
Step 2:
Download ESP8266 AT command firmware by AI Thinker.
Step 3:
press and hold Flash button(GPIO0 = GND) then press Reset button(RESET pin = GND)
release RESET button then Flash button now ESP8266 goes into Flash mode.
Step 4:
Extract downloaded rar file.
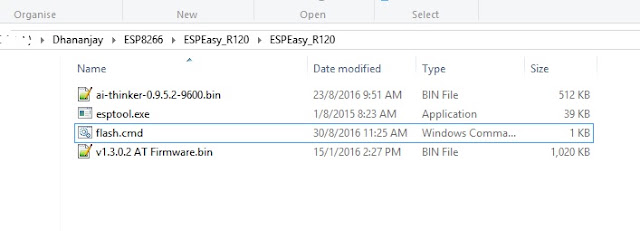
Step 5:
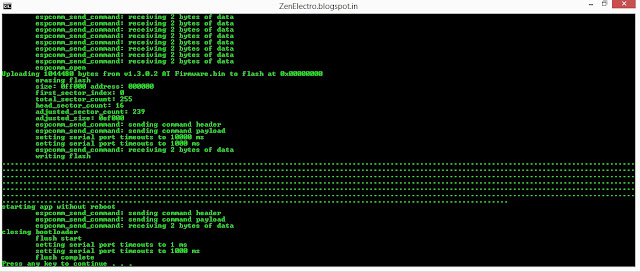
open "flash.cmd" file and wait for complete flashing process.

Step 6:
Setup local Server for receive data. I use TCPClientServe software which allow you to create local server and client to send and receive data over TCP
Download Here
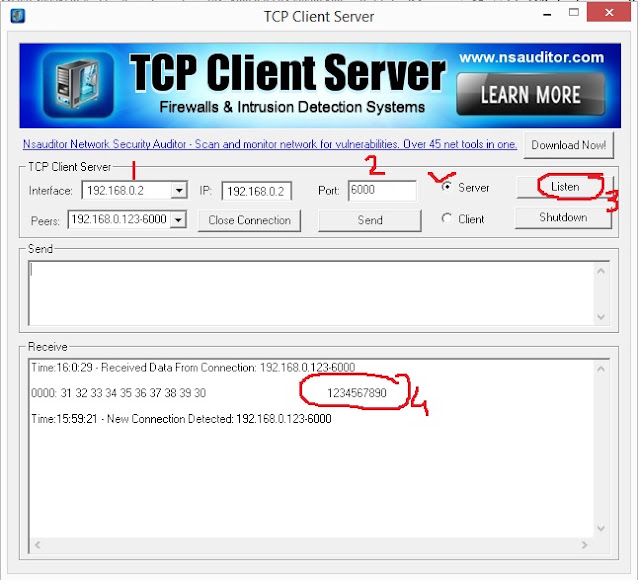
Enter port 6000 and start listening.
Step 7 :
Open Serial terminal at baudrate 115200
Give Comman Sequence To send data to Server
1) AT
2) AT+CWAUTOCONN=0 ---> disable autoconnection
3) AT+CWMODE=1 ---> set station mode
4) AT+CWJAP="MyRouter","MyRouterPassword" --->connect to local WiFi router
5) AT+CIPSTA_DEF="192.168.0.123" ---> set static IP
6) AT+CIPSTART="TCP","192.168.0.2",6000 --->your local server IP adress
7) AT+CIPSEND=10 --> number of bytes to send
8) 12345678 ---> actual data to send
Console Output:
Ai-Thinker Technology Co.,Ltd.
ready
AT
OK
AT+CWAUTOCONN=0
OK
AT+CWMODE=1
OK
AT+CWJAP="MyRouter","MyRouterPassword"
WIFI CONNECTED
WIFI GOT IP
OK
AT+CIPSTA_DEF="192.168.0.123"
OK
AT+CIPSTART="TCP","192.168.0.2",6000
CONNECT
OK
AT+CIPSEND=10
OK
>
Recv 10 bytes
SEND OK
Step 2:
Download ESP8266 AT command firmware by AI Thinker.
Step 3:
press and hold Flash button(GPIO0 = GND) then press Reset button(RESET pin = GND)
release RESET button then Flash button now ESP8266 goes into Flash mode.
Step 4:
Extract downloaded rar file.

Step 5:
open "flash.cmd" file and wait for complete flashing process.


Step 6:
Setup local Server for receive data. I use TCPClientServe software which allow you to create local server and client to send and receive data over TCP
Download Here

Enter port 6000 and start listening.
Step 7 :
Open Serial terminal at baudrate 115200
Give Comman Sequence To send data to Server
1) AT
2) AT+CWAUTOCONN=0 ---> disable autoconnection
3) AT+CWMODE=1 ---> set station mode
4) AT+CWJAP="MyRouter","MyRouterPassword" --->connect to local WiFi router
5) AT+CIPSTA_DEF="192.168.0.123" ---> set static IP
6) AT+CIPSTART="TCP","192.168.0.2",6000 --->your local server IP adress
7) AT+CIPSEND=10 --> number of bytes to send
8) 12345678 ---> actual data to send
Console Output:
Ai-Thinker Technology Co.,Ltd.
ready
AT
OK
AT+CWAUTOCONN=0
OK
AT+CWMODE=1
OK
AT+CWJAP="MyRouter","MyRouterPassword"
WIFI CONNECTED
WIFI GOT IP
OK
AT+CIPSTA_DEF="192.168.0.123"
OK
AT+CIPSTART="TCP","192.168.0.2",6000
CONNECT
OK
AT+CIPSEND=10
OK
>
Recv 10 bytes
SEND OK


Comments
Post a Comment